Monday, December 5, 2011

Grandma Vance's Fudge

When I was younger, one of the things I looked forward to most at Christmastime was my Grandma's fudge. It was heavenly, melt-in-your-mouth fudge. It is the fudge recipe I now make for my family at Christmas, and although it never tastes quite as good when Grandma made it, it is pretty amazing (and pretty simple!)


Grandma's Vance's Fudge

4 cups sugar
2 12oz. packages of chocolate chips, one semi-sweet, one milk chocolate (you can use two semi-sweet's but do NOT use two milk chocolates!)
2 cubes of butter sliced in pieces
1 12oz. can evaporated milk
1 15oz. jar marshmallow fluff/creme
1 tablespoon vanilla
1 cup chopped walnuts

Prepare a 9x13 pan by lining with parchment paper. You can also grease the pan really well, but parchment paper makes it much easier to lift out and slice.

Combine milk and sugar in a large pot (the milk froths up and will boil over if you don't use a large enough pot). Stir over medium heat until sugar is dissolved. Boil for 7-8 minutes.

In a large bowl add chocolate chips, butter, marshmallow creme, nuts & vanilla. Pour hot mixture over ingredients in bowl and mix well.

Pour into parchment lined 9x13” pan and let sit for 3 days at room temperature, then chill in fridge until firm. Slice into squares.

*I rarely have the patience to let the fudge sit for three days. It does taste better when I am patient, but I usually just put it in the fridge overnight, then it's ready to slice and eat. Print Friendly and PDF

Tuesday, November 8, 2011

Pumpkin Bars!


Pumpkin Bars
2 cups flour (I use one cup whole wheat flour)
2 cups sugar
2 teaspoons baking powder
1 teaspoon baking soda
1 teaspoon cinnamon
1 teaspoon nutmeg
1/2 teaspoon salt
1/2 teaspoon cloves
1 cup oil (I use 1 cube (cup) melted butter and 1/2 cup melted coconut oil
16 oz. (2 cups) pumpkin (I prefer fresh pumpkin or butternut squash)
4 eggs
1/3 cup chopped walnuts or pecans

Cream Cheese Frosting:
8oz cream cheese, softened
5 tablespoons butter, softened
1 teaspoon vanilla
2 1/2 cups powdered sugar
lemon juice (I like to juice a whole lemon)
milk to thin (1 to 2 Tablespoons)

Mix all ingredients, pour into 13x9x2 greased pan. Bake 350 degrees for 45-50 minutes. Cool completely.
*For tips on cooking fresh pumpkin or butternut squash see this post.
*This makes a very thick pumpkin bar which is perfect for feeding a crowd (I half the recipe if I'm not sharing).

Prepare cream cheese icing by whipping softened cream cheese with butter and vanilla until smooth. Mix in powdered sugar until smooth. Add lemon juice to taste. Stir in milk to thin frosting to spreading consistency. Frost bars and serve! Print Friendly and PDF

Sunday, October 30, 2011

Fabulous Apple Crisp

I love Autumn! All the beautiful leaves changing color, the smells of baking apples, cinnamon, pumpkin...YUM. One of my favorites is Apple Crisp. It is so simple to make and so delicious. This recipe makes one very large 9x13 pan!

Apple Crisp

5-6 apples peeled, cored and sliced (enough to fill a 9x13 pan)
1 cup flour (can use whole wheat)
1 cup oats
1 1/4 cup brown sugar
1 1/2 cubes butter (3/4 cup) softened
2 teaspoons cinnamon
1/2 teaspoon nutmeg
1/2 cup chopped pecans (optional)

1. Peel, core and slice apples. I recommend the Back to Basics Apple Peeler it has a really cool suction  ottom that adheres anywhere on the counter so you don't have to try and secure it to the edge (works much better than my pampered chef one). Sprinkle chopped pecans over apples.

2. Combine butter, flour, oats, sugar, cinnamon and nutmeg and sprinkle evenly over apples.

3. Bake in preheated 375 degree oven for 25-30 minutes or until topping is golden brown.

Serve warm with vanilla ice cream or whipped cream.

Variations:
Caramel Apple Crisp: Smother warm apple crisp with caramel syrup topping
Blueberry Apple Crisp: Mix with the apples fresh or frozen blueberries and use walnuts instead of pecans


Step 1: Fill 9x13" pan with peeled, sliced apples and chopped pecans

Step 2: Combine dry ingredients until crumbly

Step 3: Sprinkle evenly over apples and bake at 375 degrees for 25-30 minutes

Serve warm with vanilla ice cream or caramel sauce, Enjoy!
 
Print Friendly and PDF

Tuesday, October 18, 2011

Best Ever Bread

There is nothing better than a good slice of homemade bread. I usually don't let myself indluge in white bread very often, but oh is it heavenly! And you can get the same heavenly taste and lightness by doing part wheat flour (and then you don't have to feel as guilty ;)


King Arthur Flour truly is the master of all things bread. This is their recipe that I use as the bread of all bread recipes and if you've never made bread before or want to have an absolutely perfect loaf, follow this recipe.

Below that recipe I will give you my modified version that makes about 4 loaves (or breadsticks, rolls, pizza, etc... and doesn't use butter or milk, but tastes just as great) and is a bit healthier for your family. If I am going to make breadsticks I'll make my large version below and use the left over dough for bread for the week. My family gets this so rarely that they usually gobble through the entire batch within two days.

White Sandwich Bread- King Arthur


3 cups white flour
1/2 cup warm milk
1/2 cup warm water
2-4 teaspoons butter melted or oil
1 tablespoon sugar
1 1/4 teaspoon salt
2 1/4 teaspoons yeast

Dissolve yeast and sugar in warm water. Add milk, butter and salt. Add flour one cup at a time until dough pulls away from the sides of the bowl (should be soft, not sticky). Knead for 10 minutes.

Cover and let rise 1 hour. Shape into loaf, cover and rise one hour or until double in size.

Bake in 350 degree oven for 35 minutes.

Makes 1 loaf.

 
Almost White Bread (pictured above)
 
1 tablespoon yeast
2 tablespoons sugar or honey (optional but helps rise quicker)
4 cups warm water
1/2 cup oil (if you're going to eat it right away, then cut back to 1/4 cup but if you want it to be soft and moist the next day too then go for more oil)
1/2 tablespoon salt
2 tablespoons dough enhancer (optional but I think it makes a difference- could also use 2 eggs)
4 cups whole wheat flour
5+ cups white flour (keep adding until the dough is pulls away from the bowl)
 
Let yeast, water and sugar/honey proof until bubbly. Stir in oil and salt. Mix in whole wheat flour, dough enhancer and white flour one cup at a time until the dough starts to pull away from the side of the bowl.

Continue adding white flour one cup at a time until the dough is soft but not sticky. Knead for 10 minutes adding additional flour as needed. Cover and let rise until double, 20 to 30 minutes.
 
Form into loaves, breadsticks or rolls and let rise until double.
 
Bake at 375 for 25-30 minutes.
 
*Makes about 4 loaves of bread Print Friendly and PDF

Monday, October 17, 2011

Soft Sugar Cookies

This is my favorite sugar cookie recipe. I've tried quite a few and have heard people swear by the sour cream kind, but I always come back to this one because it never fails and the texture is perfect, soft but not too crumbly. They taste similar to the store bought kind except sooo much better. I think they are best with cream cheese frosting. We make these cookies every Halloween and the boys have so much fun helping me decorate them.


Soft Sugar Cookies

2 cubes butter (or margarine), softened
1 cup sugar
1 egg
1 1/2 teaspoon vanilla
3 cups flour
1 teaspoon baking powder

Cream butter, sugar, vanilla and egg. Mix in remaining ingredients. Refrigerate 45 minutes (I don't always do this, but makes rolling out much easier). Roll dough on floured surface and cut with cookie cutters.

Bake in 375 degree oven for 7-8 minutes.

*This recipe makes a couple dozen cookies but you'll be surprised how fast they disappear!


Cream Cheese Frosting
8oz cream cheese, softened
5 tablespoons butter, softened
1 teaspoon vanilla
2 1/2 cups powdered sugar
lemon juice (I like a whole lemon)
milk to thin (1 to 2 Tablespoons)

Prepare cream cheese frosting by whipping softened cream cheese with butter and vanilla until smooth. Mix in powdered sugar until smooth. Add lemon juice to taste. Stir in milk to thin frosting to desired consistency. Print Friendly and PDF

Monday, October 10, 2011

Heavenly Cinnamon Rolls


Cinnamon rolls are a treat I only let myself indulge in once or twice a year (like at conference time). These rolls are amazing with cream cheese frosting! You will not be disappointed!

Cinnamon Roll Dough

1 tablespoon yeast
1 1/2 cups warm water
1/3 cup powdered milk (or can use warm milk instead of water)
2 eggs
1/2 cup sugar
1 teaspoon salt
5 1/2 cups white flour (approximate, always pour one cup at a time- the dough should be soft but not sticky. You can make these whole wheat, but they won't be light and airy the next day- I recommend only using 1/2 wheat if you choose to)

Filling

1/2 cup melted butter
sugar (can use brown sugar for caramelized rolls)
cinnamon
raisins (optional)
pecans (optional)
*dental floss for slicing

Cream Cheese Frosting

8oz cream cheese, softened

5 tablespoons butter, softened
1 teaspoon vanilla
2 1/2 cups powdered sugar
lemon juice (I like to juice a whole lemon)
milk to thin (1 to 2 Tablespoons)

Step 1: Dissolve yeast in warm water until frothy. Stir in powdered milk, sugar, eggs and salt. Add flour one cup at a time until the dough pulls away from the sides of the bowl and is soft but not sticky. Let rise 25 minutes in a warm place until double in size.

Step 2: Roll dough into large rectangle. Coat the bottom of a large 9x13 baking dish with 1 tablespoon of the melted butter. Using a pastry brush, generously spread butter over entire dough rectangle. Sprinkle sugar on top of butter (I used about 1/4 cup), sprinkle a generous layer of cinnamon over top. Add raisins and nuts if desired.


Step 3: Starting at the long end of the rectangle, roll dough to form a long tube. Pinch dough on end to seal so it won't come unwrapped when you slice it.


Step 4: Using a long string of dental floss, slide under the dough and slice a piece off by bringing the two pieces across one another (you could also use a sharp knife, but this works the best). Place in baking dish and brush tops with remaining butter. (This makes 12-16 rolls).


Step 5: Set pan in warm place to rise. They should look like this when they're ready:

Step 6: Bake in preheated 375 degree oven for 15-20 minutes or just until golden on top. While baking prepare cream cheese icing by whipping softened cream cheese with butter and vanilla until smooth. Mix in powdered sugar until smooth. Add lemon juice to taste. Stir in milk to thin frosting. You can use more milk for thinner frosting to lightly drizzle over the rolls...OR


...if you're like me, leave it a little thicker and completely smother them with frosting! Serve warm & enjoy!

Print Friendly and PDF

Monday, August 8, 2011

Avocado Bacon Ranch Sandwich on Whole Wheat Rosemary Flatbread

That's a mouthful! BYU tv finally has an app for the iphone and you can watch awesome programs like Chef Brad. If you want to learn a few things about cooking with grains check out his programs. I especially recommend the Quinoa, Barley and Wheat ones although the others are also fascinating and I am excited to try a few new things like grinding corn.


While some grains may seem intimidating- just start with something simple like quinoa and barley (I use as a substitute for white rice in any recipe and/or add it to my bread)- they are super healthy and easy to incorporate into your everyday diet. Chef Brad also has a ton of free recipes on his website here. I will be tuning out for a month or two as we get moved and resettled, so get some new recipes from Chef Brad in the meantime...

I had to try this recipe from his show- Rosemary Flatbread. It was really easy to do and tasted amazing. I don't have spelt so I just used my regular whole wheat bread dough. I sliced it in half and made favorite sandwich: Avocado Bacon Ranch & Tomato. It was so delicious with this bread. It would also make a fabulous pizza crust.


Rosemary Flatbread

1 batch whole wheat bread dough (or any rising dough)
Olive Oil
Rosemary (I used dried and it was great)
Sea Salt

Simply roll out the dough onto a round pan and let sit until risen (about 20 minutes). Poke holes in the dough with your fingers. Spread a generous amount of olive oil over dough filling the holes. Sprinkle the top with rosemary and sea salt.

Bake at 500 degrees for 7-8 minutes or until golden brown.


Avocado Bacon Ranch Sandwich
Avocado sliced or mashed
Cheese
Bacon, cooked (or bacon bits)
Tomato sliced
Ranch dressing
Sprouts, lettuce, etc...
Whole wheat bread

Spread bread with ranch dressing then a layer of avocado. Add bacon, tomato, cheese, lettuce and additional toppings. Also tastes great with toasted bread.
Print Friendly and PDF

Monday, July 25, 2011

BEST Blueberry Muffins!


I have tried DOZENS of blueberry muffin recipes over the years hunting for the perfect muffin. Most of the ones I tried had the consistency of a  biscuit but I prefer cakelike bakery muffins.

Some passed the white flour test but failed miserably when I substituted whole wheat flour. I almost gave up on the possibility of making a delicious 100% whole wheat blueberry muffin, but I'm glad I persevered.
I am happy to say that I have FINALLY found the PERFECT Blueberry Muffin recipe!

And, Yes! It tastes just as delicious when using 100% whole wheat flour!
(top image is white flour, right is whole wheat).

So where did this elusive recipe come from? It originated from a blueberry white chip muffin recipe from http://verybestbaking.com/ but of course I had to modify it to suit my specifications... Here is the modified recipe:


BEST Blueberry Muffins!

2 cups freshly ground whole wheat flour
1/2 cup organic sugar
1/4 cup organic brown sugar
3 teaspoons baking powder
1/4 teaspoon salt
1/4 cup butter softened
1 teaspoon vanilla
1 egg
1 cup milk
Zest of one lemon (1 1/2 teaspoons)
1 1/2 to 2 cups blueberries
Walnuts, optional

Streusel Topping
1/3 cup organic brown sugar (or 1-2 tablespoons of honey)
1/3 cup oats (optional)
1/4 cup flour
1/4 teaspoon cinnamon
3 tablespoons butter

Preheat oven to 375 degrees. Line or oil muffin cups (12 to 18).

Cream sugars with butter then stir in vanilla, egg and lemon zest (do not omit zest it adds great flavor). Mix dry ingredients and stir with wet alternately with milk. (I like to add dry ingredients right on top of the wet and just mix it with a fork a little before incorporating into the wet- saves an extra bowl...)

Fold in blueberries and walnuts if desired. Spoon into muffin pans filling 3/4 full. Sprinkle with Streusel Topping. Oats are optional in the topping (pictured in the whole wheat version) and I find it easier to mix with a fork if the butter is at room temperature.

Bake for 22 to 25 minutes. Cool in pan for 5 minutes before transferring to cooling rack.

*I highly recommend using freshly ground whole wheat flour. If you use store bought whole wheat flour you should definitely use King Arthur brand, it's the only one I've used that resembles fresh ground whole wheat.

*You can also use 1/2 cup of honey instead of both sugars. And use 1 to 2 tablespoons of honey in place of sugar for the topping. The flavor and texture isn't quite as rich, but it still works. 
Print Friendly and PDF

Sunday, July 17, 2011

Honey-Lime Enchiladas

I saw this recipe on the Sisters Cafe a while ago and recently a few friends have recommended it, so I finally got around to trying it. It was much tastier than I expected! My husband just laughed at me for finding a way to sweeten up everything, even enchiladas...but he enjoyed them!

Cooked, shredded chicken, pork or beef

Honey Sauce
1/3 c. honey
Juice of one lime
1 tablespoon chili powder
1/2 teaspoon garlic powder

10oz can green enchilada sauce
Mozzarella & cheddar cheese, shredded
Corn (or flour) tortillas

Mix honey sauce ingredients together with cooked, shredded meat and set aside for 20-30 minutes.

Pour half can of green enchilada sauce in the bottom of 9x13" pan. Heat corn tortillas in microwave 15 seconds or until soft. Spoon meat mixture and shredded cheese in the center of each tortilla, roll up and place in pan. Continue until pan is full. Top with remaining enchilada sauce and smother with cheese.

Bake 350 degrees for 25-30 minutes or until cheese is melted. Then turn oven to broil and continue cooking 2-3 minutes until slightly brown and crispy. Print Friendly and PDF

Sunday, July 3, 2011

Chipotle style burritos: Black Beans, Cilantro Lime Rice, Pico de Gallo & Guacamole

I think I've mentioned before how much I LOVE Chipotle. Sadly, we don't have one near us, so the only time we get to indulge ourselves is when we travel. SO we like to make our own version at home. I am pretty close on everything except the chicken- I am not willing to spend the time to figure out those complex flavors, so for now I just go with grilled chicken marinated with a little lime juice and montreal seasoning or zesty italian dressing.

The cilantro lime rice recipe I posted previously here http://ldsbaker.blogspot.com/2010/10/cilantro-lime-rice-with-black-beans.html  the image shown is with barley, but you can also use white rice (pictured above). I also added a little chopped green onion to the version shown above.

Black beans...Squeeze the juice of one lime, stir in some salt, cilantro and cumin to flavor your beans. See below for simple instructions on cooking these in the pressure cooker- takes only 30 minutes!

Simple Pico de Gallo: This is my simply "wimpy" version of pico de gallo- simply chop a bunch of tomatoes, some green onions (including white part), cilantro and juice of one lime. Refrigerate until ready to use.

Guacamole: I never measure these spices, just add a bit here and there until you reach the flavor your tastebuds desire... 1-2 ripe avocados, salt, pepper, fresh lemon or lime juice, garlic powder, diced tomatoes, cilantro.

Serve in warmed tortilla with or without grilled chicken.

Cooking Black Beans in Pressure Cooker:
I have been asked a few times how to cook beans in a pressure cooker. It is really simple. I just take 2 cups of dried beans- sort and rinse, (no soaking necessary) add to pressure cooker and fill with water to the 2/3 full line. Turn stove on medium high and as soon as you hear the whistle, turn it down a bit so that it still whistles softly but isn't steaming it's top off. Continue cooking for 20 minutes. Turn off the heat and let it sit on the burner while you prepare the rest of your food. I, as you know, am impatient and if I need them fast, I use a fork or knife to lift the release valve and let the excess steam out. Once the steam is all out you can open it, rinse the beans and eat.

Fresh cooked beans have a different flavor so you may find that you need to salt them, although after time you'll get used to not having so much salt on them. There is a great chart about how long to cook different types of beans at this website http://www.fabulousfoods.com/articles/27942/how-to-cook-beans-in-a-pressure-cooker

Enjoy!
Print Friendly and PDF

Monday, June 20, 2011

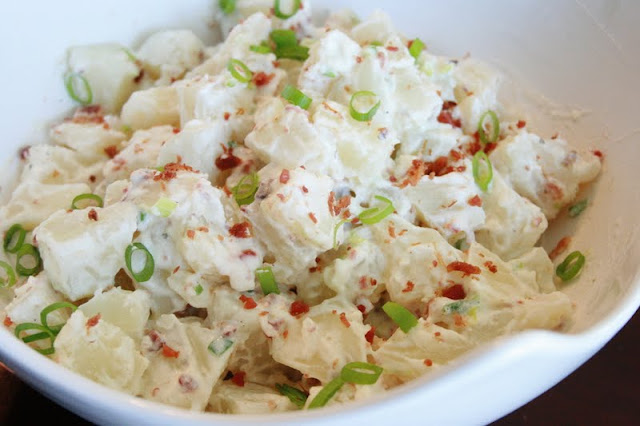
Bacon Ranch Potato Salad

I have never liked potato salad. Ever. Until last summer... I have mentioned before (more than once I'm sure) my general dislike for mayo-based dishes and most potato salads are smothered with mayo or mustard, not to mention pickles.

This version of potato salad is light on mayo and heavy on flavor and is just as good (in fact I think better) warm as it is cold. And the only thing that makes it better is to stir in fresh sweet white corn.


Bacon Ranch Potato Salad

2 lbs red potatoes unpeeled or Idaho potatoes, peeled
1/4 cup mayo
1/4 cup sour cream
2 green onions chopped, including white part
Juice of 1/2 lemon
1/4 cup milk
Salt & Pepper to taste
4 slices bacon, cooked and crumbled (or real bacon bits)
Sweet white corn (optional)
1 tablespoon dry ranch dressing mix

Wash potatoes and slice into 1/2 inch chunks. Cover potatoes with water and boil until tender, about 10 minutes.

Mix mayo, sour cream, green onions, lemon juice, milk and ranch dressing mix in a large bowl.

Drain potatoes and let cool 5-10 minutes. Add to ranch mixture and toss with bacon and corn if desired. Serve warm or cold. Print Friendly and PDF

Sunday, June 12, 2011

Pasta al Pomodoro

This is my favorite version of spaghetti. Doesn't look like much, but the flavor of fresh basil and creamy butter is so scrumptious. It's another one of my last minute go-to meals.

1 tablespoon olive oil
1/2 onion, minced
4 cloves of garlic, minced
3-4 fresh tomatoes, diced (or canned- using juice to thin sauce)
Salt, to taste
handful of fresh basil leaves
12oz whole grain spaghetti or angel hair pasta
2 tablespoons real butter
1/4 cup fresh grated parmesan cheese
2-3 tablespoons milk, to thin sauce

Cook spaghetti according to package directions. Drain.

Heat olive oil in skillet over medium heat. Saute onion until soft. Stir in garlic and cook for one minute. Dice tomatoes (You can puree if you prefer a smoother sauce). and stir into onion mixture. Season lightly with salt. Add basil leaves, cover and cook stirring occasionally until sauce thickens and flavors meld, about 20 minutes. Add additional diced vegetables if desired.

Stir in milk to reach desired consistency. Remove basil leaves and toss tomato sauce with pasta, stir in butter. Sprinkle with parmesan cheese. Serve immediately.

*Recipe modified from Bon Appetit Print Friendly and PDF

Sunday, May 29, 2011

Barley Jambalaya

I got this recipe a few years ago from my friend Elysa and it is so yummy! It makes a HUGE pot and even tastes better the next day when the spices have had a chance to meld. The kids love it and it's super healthy.
2 cups barley
5 cups chicken broth or water
2 bay leaves (optional)
1 cup cooked, shredded chicken (can use canned) or shrimp
1 tablespoon olive oil
1 onion, diced
1 cup diced fresh peppers (I prefer red & yellow)
1 cup diced celery (4-5 stalks)
2 cloves garlic, minced
1 15oz can diced tomato (or two large fresh tomatoes, diced)
2 8oz cans tomato sauce (or 1/2 jar spaghetti sauce)
1 teaspoon salt
1 1/2 teaspoon oregano
1 teaspoon pepper
1 teaspoon thyme
1 teaspoon italian seasoning
1/2 teaspoon cayenne pepper (I never add this, I'm wimpy when it comes to heat and I don't have any)

1. In a large stock pot cook barley, chicken broth or water and bay leaves, cover and bring to a boil. Reduce heat to medium and simmer 1 hour.

2. In large pan heat olive oil and saute vegetables and garlic. Stir in meat, spices, tomates and tomato sauce and cook over medium heat until boiling. Reduce heat, cover and simmer on low until barley is done.

3. Remove bay leaves from barley. Stir vegetable/tomato mixture into barley. Serve warm. Tastes great reheated the next day- add a little water or spaghetti sauce to thin if desired. Print Friendly and PDF

Wednesday, May 18, 2011

Best Belgian Waffles

I love light airy belgian waffles. I like this recipe because it doesn't use yeast, so no waiting. Whenever I get a strawberry shortcake craving I just whip up a batch of these for breakfast, YUM.

Belgian Waffles
2 cups flour
2 teaspoons baking powder
2 tablespoons powdered sugar
1 tablespoon oil
1 ½ cups milk
3 eggs, separated
2 teaspoons vanilla
pinch of salt

Beat egg whites until they form stiff peaks (I have never actually beaten them until peaks form- just until frothy and foamy and they turn out perfect). In a separate bow, mix all other ingredients, then gently fold in the egg whites. Cook on belgian waffle iron. Serve warm with fruit or syrup.

Makes 5-6 large waffles

*These tend to puff up really big then fall as they cool. However if you add 3 teaspoons of baking powder they won't fall and will be crispy- so if you prefer crisp firm waffles add the extra, otherwise enjoy soft fluffy waffles and eat fast! Print Friendly and PDF

Sunday, May 1, 2011

Chocolate Peanut Butter Cupcakes

I think I may have found a runner up to Red Velvet... These are so delicious! And I'm not even much of a peanut butter fan... Start with a regular old chocolate cupcake recipe, I like these chocolate sour cream cupcakes then top with peanut butter buttercream frosting and chopped Reese's peanut butter cups.

Peanut Butter Frosting
1 cube butter, softened
2 tablespoons crisco
3/4 cup peanut butter
2 teaspoons vanilla
2 1/2 cups powdered sugar
1-2 tablespoons milk

Cream butter, crisco, peanut butter and vanilla. Mix in powdered sugar and thin with milk to spreading consistency. Spread onto cooled chocolate cupcakes and top with chopped Reese's peanut butter cups (you can freeze the Reese's first for easier chopping). Print Friendly and PDF

Sunday, April 24, 2011

Roasted Chicken, with vegetables


I've posted a time or two before about how much I love rotisserie chicken...I decided to be brave and try roasting one myself. I was actually very intimidated by the thought until I saw an episode of the Food Nanny that featured someone with an even greater raw meat phobia than I.

I determined then to conquer my fear. And I'm glad I did, it turned out fabulous! Moist, juicy, tender chicken. Even better than from the store. Not only that but for less than $5 we had a yummy dinner, enough leftover for another dinner plus after making chicken stock and "picking the bones" had enough left to make our new favorite chicken taquitos, not to mention the chicken stock and gravy I will freeze and use for later. It's the tastiest budget meal, I just wish I'd known years ago how easy it was to do!

Roasted Chicken with Vegetables
1 whole chicken
1-2 tablespoons olive oil
1 lemon
3 teaspoons salt
1/2 teaspoon pepper
1 teaspoon garlic powder
1 teaspoon paprika
1 teaspoon thyme
1 cup water

1 onion, diced
4 carrots, chopped
4 stalks celery, chopped
5-6 potatoes, cubed

Pair of rubber gloves (if you're wimpy like me)
Large roasting pan (I picked mine up for only $30 at BB&B)

Chop all veggies and mix all dry seasoning ingredients in a small bowl. Preheat oven to 400 degrees.

Then don those gloves unless you're brave enough to touch raw meat (I finally am!) Now, remove and discard giblets from chicken (this is the gross part but fortunately I discovered mine were neatly packaged in a bag so I didn't even have to see them!) Rinse chicken cavity and pat dry with paper towel.

Give the chicken a good rubdown with some olive oil and then rub the seasoning mixture inside and out. Set chicken in roasting pan and place chopped veggies all around it. It's recommended to refrigerate this for a few hours or overnight, I didn't because I didn't plan ahead- and it still turned out perfectly tender and juicy, so don't worry if you miss this step.

It is recommended to place the chicken breast side down but honestly I have no idea which is the breast and which is the back and since you rotate it halfway through cooking it really doesn't matter (details, details). So just put the thing in however you want and after about 45 minutes turn it over. I also added a cup of water at this point to keep the veggies tender and help the chicken stay moist. I baked for another 45-50 minutes. It should take about an hour and a half for the entire cooking process. Just cut into the center to make sure the pink is gone- but do not overcook or it will be dry. The vegetables are flavored nicely by the drippings so no need for extra seasonings.

After spooning out the vegetables I poured the leftover drippings into a saucepan and made some delicious gravy by just adding some flour and thinning it with milk to make it creamy. There are some pretty good instructions for that here http://simplyrecipes.com/recipes/how_to_make_gravy/

Then took the remaining chicken bones and skin and made some chicken stock to use later (see below. It freezes really well so you don't have to use right away and is much more flavorful than storebought stock). So there you go, a good 2-3 meals (soup, chicken taquitos, chicken salad sandwiches, etc.) for $5.

Chicken Stock

Chicken- bones, skin and all, including pan drippings
1 onion chopped- with skin
1-2 stalks celery roughly chopped
Other stray vegetable parts

I'm sure there are lots of ways to make chicken stock, but I'll share the way I do it.

After you've removed the meat you want to eat from the chicken, put the entire thing in the pot including any pan drippings and vegetable trimmings, and fill the pot to almost cover the chicken (the more water the thinner the stock will be).

Add all ingredients into large stock pot and fill to cover two thirds of the chicken.

Bring the mixture to a boil and reduce heat. Simmer on low for 1-2 hours. You'll know when it's ready because your entire house will start to smell like chicken noodle soup. Turn heat off and let sit on the stove until cooled (just don't be like me and forget about it until the next morning!)

Strain the liquid into a container- it will look something like this (right). Throw away the vegetable trimmings and pick the meat off the chicken bones- it will be soft and come off easily. You'll be surprised- you should get around a cup or so of shredded chicken which is perfect for taquitos, adding to soups or making chicken salad sandwiches.

Put the liquid in the refrigerator overnight. It will solidify into a jello-like substance which looks /7kind of  gross- but that means you did it right. Now you can either freeze it or add water to thin it out and use in your favorite recipe- everything you make with this will taste SO much better than with storebought stock. Here are a few of my favorite recipes that use chicken stock:

Chicken Noodle Soup (simply add noodles and veggies!)
Chicken Tortilla Soup (perfect for using this leftover chicken)


Print Friendly and PDF

Saturday, April 16, 2011

Double Chocolate Cookies

Can you say YUM!?! These cookies are so moist, fudgy and cakelike. I got the recipe from Annie's Eats, if you haven't checked out this site you have got to (makes mine look like child's play). She has some fabulous recipes out there and I can't wait to try them all. I of course slightly modified the recipe so if you want the original plate size cookies check out her site.


Double Chocolate Cookies

2 cubes of butter, softened
1 1/4 cups sugar
2 eggs
1 teaspoon vanilla
1/2 cup dark cocoa powder (I used regular)
2 1/4 cups flour
1/4 teaspoon salt
1 teaspoon baking powder
2 cups semi-sweet chocolate chips (I used dark chocolate)

1. Preheat oven to 350
2. Cream butter and sugar. Mix in eggs and vanilla.
3. Stir in flour, salt and baking powder. This batter is really thick and sticky, I recommend using a stand mixer (I used cookie paddles).
4. Stir in chocolate chips.
5. Using a cookie scoop (trust me it will make your life sooo much easier!) scoop tablespoon size balls onto cookie sheet.
6. Bake for 15 minutes. Let cool slightly before transferring to cooling rack.

*makes 3 1/2 dozen medium sized cookies Print Friendly and PDF

Sunday, April 10, 2011

Cheesy Bacon Popovers

This was in the Williams Sonoma kids cookbook I recently bought (I modified to be whole wheat). They are so delicious and fun for kids!

Cheesy Bacon Popovers

Bacon, 8 slices fried 
1 cup shredded sharp cheddar cheese
1/4 cup grated parmesan cheese
1 cup whole wheat flour
1/2 teaspoon salt
2 eggs
1 1/4 cups milk
2 tablespoons butter, melted

Preheat oven to 450. Grease 12 cup muffin pan with butter or cooking spray. Spoon 1 tablespoon of bacon into each cup. Mix the cheeses together and spoon 1 1/2 tablespoons into each cup.

In a large bowl stir flour and salt. Whisk in eggs, milk and melted butter. Pour mixture evenly into 12 muffin cups.

Bake for 15 minutes. Reduce oven temperature to 350 and bake for another 15 minutes until popovers are puffed and golden. Do not open the oven while baking or they will fall. Serve warm.

*Also tastes great using chopped red or orange peppers and green onions in addition to or in place of bacon. Print Friendly and PDF

Tuesday, April 5, 2011

South of the Border Dip

I can't believe I haven't posted this recipe yet. I got it from my friend Annmarie and it is so yummy we make it all the time. It's one of those recipes that if I had judged it by the ingredients I would never have made it, but fortunately I tried it first and it is a keeper. I know this is a terrible picture but trust me, it's delicious.

South of the Border Dip

8oz Cream Cheese, softened
1 1/4 cup shredded Monterey jack cheese
1 4oz can diced green chilies
1/2 cup mayonnaise
1/8 teaspoon black pepper
1/4 teaspoon chili powder
1/4 teaspoon cumin
1/2 teaspoon garlic powder

Preheat oven to 350. Beat cream cheese until smooth. Stir in 1 cup shredded cheese and next six ingredients until combined. Spread into baking dish. Sprinkle remaining cheese on top. Bake 20-25 minutes or until hot and bubbly. Garnish with cilantro and serve with chips (Target's blue corn tortilla chips are delish). Print Friendly and PDF

Wednesday, March 30, 2011

Creamy Chicken Taquitos

My friend Melissa posted this on her blog a few weeks ago and I finally made them. They are so delicious! Definitely being added to my regular meal rotation...

Creamy Chicken Taquitos
2 cups shredded cooked chicken
3oz cream cheese
1/4 cup salsa verde
1 tablespoon fresh lime juice (1/2 lime)
1/2 teaspoon cumin
1/2 teaspoon chili powder
1/4 teaspoon garlic powder
3 tablespoons chopped cilantro
2 tablespoons sliced green onions
1 cup grated cheese (I used 1/2 pepperjack and 1/2 monterrey jack)
12 small flour tortillas
Oil for misting

Preheat oven to 400.

Heat cream cheese in microwave safe bowl for 20-30 seconds until soft. Stir in salsa verde, lime juice, cumin, chili powder and garlic. Stir in cilantro, green onions, chicken and cheese.

Heat 4 tortillas at a time in microwave for 20 seconds to soften. Scoop 2-3 tablespoons of chicken mixture into the middle of each tortilla, keeping the mixture 1/2 inch from edges and roll tightly. Place seam side down on metal baking sheet. Line up but don't let them touch.

Spray tops lightly with oil and bake for 15 minutes or until crisp and ends are golden brown. Print Friendly and PDF

Saturday, March 26, 2011

Olive Garden

I don't know how I could have missed this website! I am always searching for copycat Olive Garden recipes and just discovered that they have a ton of them listed here! They even have their alfredo sauce and bolognese sauce recipes listed! (you can use apple cider/red/white vinegar and or chicken broth in place of the wine in these recipes.) Enjoy! Print Friendly and PDF

Friday, March 25, 2011

Perfect Chocolate Chip Cookies *updated coconut oil instead of shortening

This is my favorite chocolate chip cookie recipe. I used to loathe making cookies because they always turned into flat greasy pancakes with chocolate chips clustered in the middle. A good friend taught me the secret is to use half butter (or margarine) and half shortening (*I've since discovered substituting coconut oil makes even softer yummier dough- and does not leave a coconut taste!). This recipe makes perfect cookies every time. Make sure you're on a well established exercise plan before trying these though- you cannot eat just one!

Chocolate Chip Cookies
1 cube butter, softenend
1/2 cup shortening 1/3 cup coconut oil, softened
1 1/4 cup brown sugar
1 egg
2 teaspoons vanilla
2 cups flour
3/4 teaspoon baking soda
1/4 teaspoon salt
1 to 1 1/2 cups chocolate chips
1 cup chopped pecans

1. Preheat oven to 375.

2. Cream butter, shortening  coconut oil and sugar. Stir in egg and vanilla.

3. Add flour, baking soda, and salt and mix well.

4. Stir in chocolate chips and nuts.

5. Drop by spoonfulls onto ungreased baking sheet and bake 10-12 minutes. Be sure not to overcook. Let cool on baking sheet for 5 minutes before transferring to cooling rack. Print Friendly and PDF

Tuesday, March 22, 2011

Lemon Chicken Picatta with Roasted Potatoes


Do you get this magazine? If not, you totally should. It has amazing yummy eay recipes. Then again...you could just read my blog because a good portion of the yummies I make come from this magazine. Like this chicken picatta with roasted potatoes I made for dinner last night. So delicious...

Lemon Chicken Picatta
3 large lemons
2 large chicken breasts
1/4 cup mayo (or 1 egg beaten)
1 cup whole wheat bread crumbs seasoned with italian seasoning & garlic salt
2 Tablespoons olive oil
2 teaspoons chopped fresh parsley
1/2 cup chicken broth
1 tablespoon butter
Whole wheat pasta

Slice chicken breast in half width-wise to make four thin pieces of chicken (mine was actually thick enough to be cut into 4 large and two small pieces). Spread mayo on both sides of each chicken slice (the Pampered Chef silicon brush works great for this) and coat with bread crumbs.

You can make your own bread crumbs by broiling bread in the oven for 2-3 minutes, flipping to brown on both sides. Bread should be very crisp. Add to food processor to fine crumbs.
Cut 4 thin lemon slices from half of one lemon; squeeze juice from remaining lemons (can microwave for 30 seconds to make it easier). Set aside.


In a large pan cook half a box of angel hair pasta according to package directions, drain.
Heat oil in large skillet over medium high heat. Cook chicken for 5 minutes, turn and cook for another 5 minutes. Transfer to a plate and cover with foil to keep warm.

In the same pan add lemon juice and chicken broth and cook over medium high heat 6-8 minutes or until slightly reduced, stirring occasionally. Add butter and lemon slices and cook 3 to 4 more minutes.

Place chicken over pasta and pour lemon sauce over top and sprinkle with fresh parsley.


Roasted Potatoes
4-5 medium potatoes cubed (or sliced for smaller potatoes)
6 slices of bacon chopped
3 tablespoons Italian Dressing
2 teaspoons fresh chopped parsley
1/4 cup grated parmesan cheese

Heat oven to 400.
Put potatoes on 15x10x1" pan. Top with bacon and zesty italian dressing. Bake for 45 minutes stirring halfway through.
Top with parmesan cheese and parsley.

*the original recipe had a sauce of mayo, lemon juice and garlic to pour over the top but these potatoes were so flavorful I didn't think it needed the extra step...
Print Friendly and PDF

Saturday, March 19, 2011

Chicken Potpies

When I was in Nashville I picked up this great kids cookbook from Williams Sonoma: Cooking Together. There are so many fun and healthy recipes dressed up to appeal to kids. Ethan loves to help me in the kitchen and one of his favorite things is to get the recipes from the Highlights High Five magazine and make them. So this book is perfect. He can flip through and choose what he wants to make. Our first selection was chicken potpies and they were YUM. I didn't have any puff pastry so I just made a pie crust, but I think puff pastry looks prettier and would be more fun for kids (and certainly easier for you). I also used homemade chicken stock which added incredible flavor, I'll outline how to do that below the recipe...

Chicken Potpie

3 T. olive oil
1 chicken breast, diced
1/2 onion, chopped
2 carrots, chopped
2 potatoes, peeled & diced
3 T. flour
4 cups chicken broth (or 3 cups chicken stock)
Salt & pepper to taste
1/2 heavy cream
1 cup frozen peas
1 sheet puff pastry, thawed
2 T. butter, melted

Preheat oven to 350 degrees. In large pan heat 2 tablespoons of oil. Add chicken and cook until browned. Set aside. Add remaining 1 tablespoon of oil and cook onions. Stir in carrots and potatoes and cook until they start to get soft- about 5 minutes.

Stir in flour. Add chicken broth and bring to a boil. Cook until vegetables are tender and mixture has thickened. Add salt and pepper and stir in cream, cooked chicken and peas. Pour chicken mixture into six 1-cup oven safe dishes.

On floured surface roll out puff pastry. Cut out six 3" circles with biscuit cutter. Using small cutter (or knife) cut out a hole in the top of each round. Top dishes with pastry rounds and pinch around the edges. Brush the tops with melted butter.

Bake until crust is puffed and golden, 20-25 minutes.


How to make Chicken Stock
One of my favorite things to buy is a rotisserie chicken. We eat the chicken with some mashed potatoes and french bread the first night. Then we can use the rest to make chicken noodle soup and/or homemade chicken stock.

For the stock, bring remaining chicken bones to a boil in a large pot filled with water. You could add onion and celery for additional flavoring. Bring to a boil, reduce heat and simmer for about 2 hours. Strain chicken mixture and put the juice in the refrigerator. The remaining chicken will have fallen off the bones and you can use this in soup- I used mine in the potpies and it was excellent.

The next morning your chicken juice should look like chicken jello. It will kind of freak you out at first- but that is a sign that it was successful. You can then thin it with water to make chicken broth or use it as chicken stock. I used about 3 cups of chicken stock and thinned it down with an additional cup of water and it was the best potpie filling I've ever had. You can also freeze this and use it for later. A great way to get the most out of a $5 chicken!

Print Friendly and PDF

Thursday, March 17, 2011

Rainbow Pancakes

In honor of St. Patrick's Day we made rainbow pancakes. It's super easy and the kids just love it.

Simply mix up your favorite pancake mix, set out bowls for each color, pour enough for one pancake into each bowl, add food coloring and mix!

Just be sure not to let the pancakes brown- cook at a slightly lower temperature than you normally would and use cooking spray instead of butter on the pan. Aunt Jemima never looked so good!

        
Print Friendly and PDF

Sunday, March 13, 2011

Peanut Butter Monster Cookies (flourless)

I wanted to make cookies for my friend who cannot eat gluten and came across this recipe. I didn't expect too much from them, lacking flour and all, but was really surprised at how yummy they are!

They are soft and moist and quite similar to my Oatmeal Cookies, just with peanut butter instead of flour.

Peanut Butter Monster Cookies

1 1/4 cup organic brown sugar
1/4 cup organic sugar
1/2 cup butter, softened
3 large eggs
1 1/2 teaspoon vanilla
1/2 teaspoon salt
1 teaspoon cinnamon
2 teaspoons baking soda
1 1/2 cup natural peanut butter
4 1/2 cups rolled oats
1 cup organic chocolate chips
1/4 cup craisins
1/4 cup raisins

In a large mixing bowl cream butter, sugars, egg and vanilla. Stir in salt, cinnamon, baking soda and peanut butter. Add rolled oats and mix until combined. You will need a stand mixer for these- they are thick cookies to try and mix by hand. Stir in the chips, craisins and raisins.

Drop by spoonfulls onto ungreased cookie sheet. Bake at 350 for 10 to 12 minutes (if you are using stoneware it takes a bit longer to bake). Let cookies sit for 5 minutes before transferring to cooling rack.
Print Friendly and PDF
Related Posts Plugin for WordPress, Blogger...
Pin It button on image hover